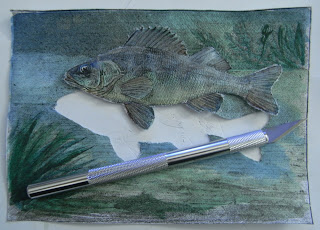
Another fish card. This time a perch (german: Barsch, french: perche). Also not in true colours but with 3D effect ^^
This time I also used a little bit of gold and silver water colours but the metallic effect doesn't transfer to the photo. But trust me it is really nice! :) Especially because it is only a shimmer and not overwhelming. On the details you can see the depth of the picture.
It is a very easy procedure to make on of these cards. Just print out a picture you like with a critter. You don't have to follow my liking for this cute fish with all the spiky fins! Just use black and white maybe with a little bit of higher contrast.
Just make a first layer of colours of your liking. Don't be to accurate!
I use artistic water colours. I have them for a really long time!
I overlay the fish with silver and gold water colours. If you use the metallic water colours the colours beneath will shine through at sooon as the colours are dried.
Cut it out with a sharp paper knife.
I don't like the outlines of the paper so I make more "messy" ones. Just fold the paper a little bit over the edge of your cutting map or table.
Go along the paper line, scratching it a little bit with the paper knife.
Carefully tear the paper across this scratched line...
All frayed outlines :)
I painted over the outlines again with some water colour. The paper takes the colour extremly well at the frayed outlines. I think it is a little bit like a darker surrounding which gives a nice effect.
Glued on black cardboard (not paper! should be more stable)
I paint the inner cutting lines black so there is nothing white more to see.
Put one a little name tag. You could also use other names, wishes, greetings...
Just painted two little dots as "nails".
The fish also glued on black cardboard for more stability...
...and cut out!
The outlines were also painted black as well as some lines of the fish body.
I use a white laquer pen for the basic of the eye.
And with a black laquer pen the pupil. The laquer pens gives a slightly shiny effect like the eye is in reality a little bit "wet".
For the 3D effect I needed spacer. You can buy spacer in the shop but this glued spacers are mostly white and you could see the white shining through the fish and the background. Therefore I just glued three layers of the cardboard together...
...cut them in the desired shapes and glued the pieces on my underground.
You see, three layers of cardboard is really not too thin! On the contrary!
And the last step: The fish glued on top! I put the glue direct on the spacers and press the fish carefully onto them. Because the fish is also layered with cardboard it is not to fragile :)


really pretty, I'd love to try that!
AntwortenLöschendon't the water colours overlay the black ink from the printer?
It's printed with a laser printer and it never bleeded... but don't know how it would be with an ink printer. Mh... but maybe one could create nice effects with some bleeding colour :)
AntwortenLöschenThose are fun...
AntwortenLöschenThat is incredible!! Seriously, I am totally impressed. Love the look!! :)
AntwortenLöschenThank you for sharing, if you are interested in office repair services, please contact the information below
AntwortenLöschenTháo lắp bàn ghế văn phòng
Sửa chữa ghế văn phòng tại hà nội
Dịch vụ sửa ghế văn phòng trọn gói