Posts mit dem Label tag werden angezeigt. Alle Posts anzeigen

Freitag, 18. Januar 2013

Swallows, swirls and vintage paper


Some impressions of cards and wrappings, of tags and comissions I made before and especially because of christmas :)

Just pages of an old book, one of my hand carved swallow stamps, swirl stamps (I used them from viva  decor) and a stamping pad with silver ink...

...oh... and of course a scissor and glue ^^


Dienstag, 20. November 2012

Advent calendar 2012 - ongoing process


For a long time now I make advent calendars. It started with my sister and my brother when they were really small and I just a teenager... and I just added people which are dear to me on the list. Our parents get one together and a friend of mine gets a special advent calendar with the one and only theme in all the years: pink! 


While collecting stuff and sweets, stamping and glueing the tags... I realized that one person is missing on my list: Rumpel. We started our relationship in january this year, so this is really a first one ^^ (the one above is the one for him! Already hanging at the wall in the kitchen)


Old book pages (the colour is due to real age! No way to get this by any painting!) glued on card board, stamped card board...


You see the beautiful silver in the black? First I put a little bit of silver ink on the stamp and then went over with black ink.


I also stamped black on pink cardboard or silver on the old book pages. I like the vintage look. 


For my brother (tophino) and our parents I made little paper packages with old music sheets from rumpel. He had some printed on white paper and some on recycled paper.... I hung them at the key just to keep them out of the way and safe. Now they are already in the kitchen at my parents home! Just forgot to take pictures...


...more tags...


...music sheets...


...you see how great the silver ink is? It really reflects the light!


I also packed the advent calendar for my sister Lachafa. From five advent calendars for six people... four are finished! 

Wrapping is really time consuming!


Sonntag, 18. Dezember 2011

Dots and more dots and recycled dots!


While I am sitting here and waiting for word and the PC in general to work with me (saving some files, printing some stuff... but the PC won't cooperate with word anymore. Hey, both systems I use are from the same company, please stop being so bitchy to each other!) I thought I could upload pictures from the stuff I made over the last weeks. At the moment my blog is not really up to date but this may change hopefully after christmas :)

So here we go: Some little tags I made. 


I used some old gift wrapping paper, glued it on recycled cardboard (we all have enough of this kind of card board at home!) and cut out little circles.


Then I cut out little squares with some "spike-like" structures and painted them silver with a silver edding. And no need to be careful about the spikes (or whatever I should call them), just cut them freehand, they'll always look perfect! :)


I cut another square (without the funny spikes this time) out, so I cut glue both suqares together.


Between the card board squares I put my little circles and some yarn...


Finished.


Really fast, just a sweet little tag made :)


Freitag, 4. November 2011

I never showed you this stamps!


As you see this are really basic stamps. I made them all from the rubber of normal school erasers )the really cheap ones ^^). I like the random background / muster stamps and I think there is always a need for a lot of arrow stamps! Don't you think so? And tags... no one should ever forget tag stamps! 


And a little castle... and a tiny house... and just a square. But sometimes you need a square! And don't forget I am just using a black ink pad to test and show the stamps. I think a lot of them would be quite cool in a lighter colour to create some kind of background texture.


I am really sorry I forgot to take pictures how I carved the stamps. I wanted to because especially a tag or an arrow is quite easy to do even for your first own handcarved stamp :)


Freitag, 7. Januar 2011

Silhouette cards and tags... (I love aceton transfer!)


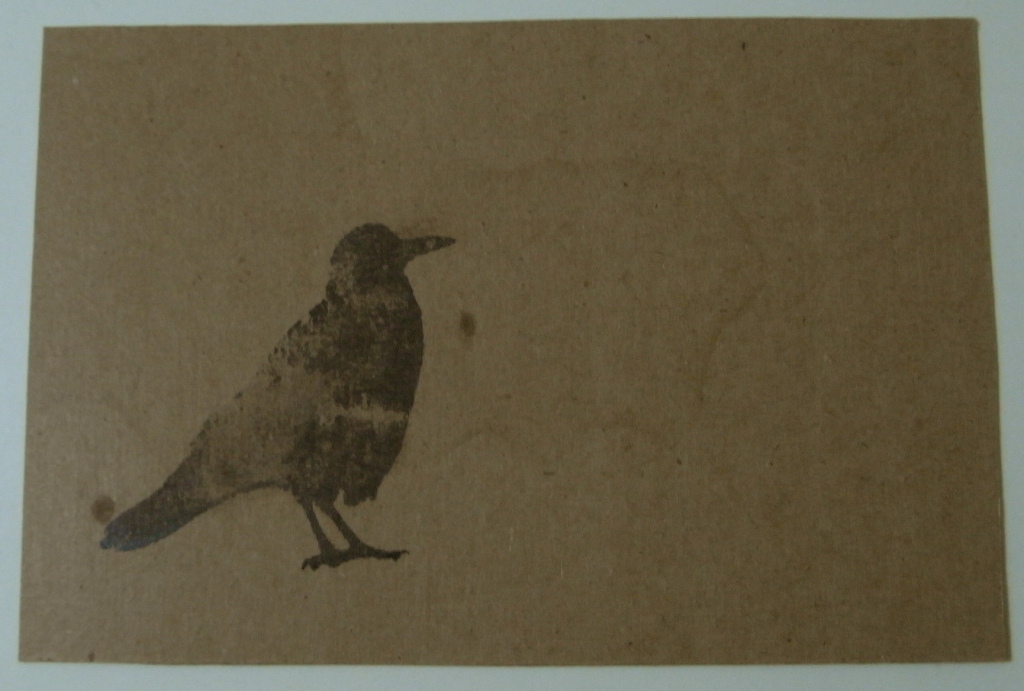
I just had to make some cards by aceton transfer now that I have some prints from a new laser printer (No, not mine *sniff*). I thought that the combination of the cardboard and the pictures you get with an aceton transfer would go great together.

And yes, in my point of view the old cardboard with the little bit rough structure of the surface and the worn out / rubbish (a little bit vintage, shaby...? don't know the actual nomenclature ^^) look of the black ink turned out to be a real good combination :)

I made a little collection of cards...


My crow stencil...


...you see my little mistake? The script is mirror inverted!


...of course the zebra isn't missing...


...one of my earlier loves from Karens graphics fairy!


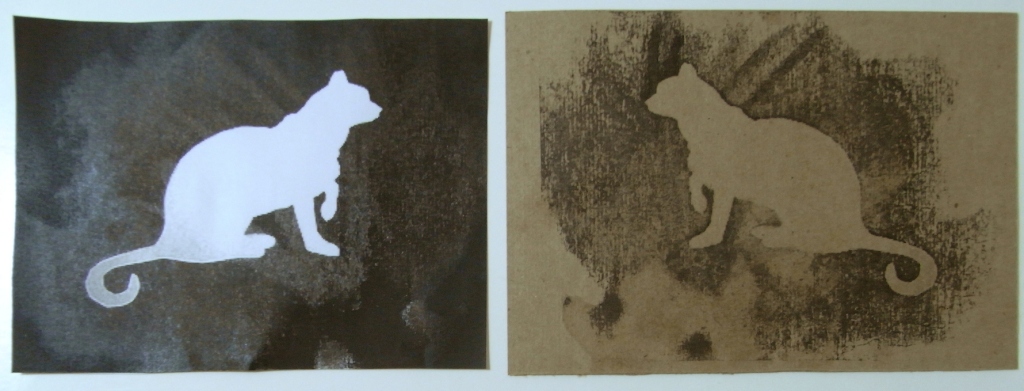
To the left you can see the print after the transfer...


I tried several different methods (or better said a little bit different procedures...). I won't write them down just concetrate on the most important thing for the transfer:

Lay your print onto the desired surface (also wood or fabric is working quite well!).
Put a little bit aceton on a paper tissue and NOT on your print!
Now you have to be fast:
Press the paper tiessue with the aceton on your print.

And I mean "press"! It is only during the first contact with the aceton (or other kind of solvent you are using but aceton works best for me) that the colour starts bleeding. As soon as the aceton dries again the colour won't ever be transferable again (regardless how much aceton you would spill over the print). Also without the pressure the colour won't bleed into your target but stays in the print.

Look at the picture below: On the left side I used some pressure but put the aceton direct over the print. On the right side I used the procedure described above.

In short I would say: Pressure and aceton should be used at exact the same time!


And of course I used some of the tags I cut out yesterday ^^

You see how my skill improved?


The horse is an image from graphics fairy. I also made the cat and the swallow stencil from picutres from graphics fairy (Oh, I just love her collection!) The crow and the tree stencil are my own graphics :)

I have a lot more stencils and things I made by using them, just have a look if you like or jump over here for how to make your own one :)

Donnerstag, 6. Januar 2011

Inspirations: Material (Paperstuff + tags)


This blog entry is a little collection about the materials which inspires me and in this case especially about paperstuff. You can see in the first picture a lot of the small paper items I am making. I just tried out several things like stamping with black ink on colourful backgrounds or painting on these backgrounds or putting an picture with adhesive tape on it (have a look here for how I am doing this :) ).

The most important thing is the paper I used.

This was made with artistic water colours. I just paint a lot of green and blue colors in stripes next to each other and afterwards put some silver on top. Nothing more...


Here the whole paper.


You can do this with a lot of colours...


...and if you add salt (really just normal salt nothing special) on top of the still wet water colours you get this effect!


I have quite often now coloured my papers with coffee (like here) but now I tried a paper tissue. The cool result is that after drying it doesn't get so hard like normal paper but remains some of it softness. Therefor it may be useable for a lot more crafting projects than normal coffee coloured paper.


After drying I wrote a little bit with a white laquer pen in it. I love the effect!


I get a lot of this cardboard. It was used as packaging material and it is really easy to work with. It is about 1 mm thick and I use it also for postcards and things like this. Not so stable like the cardboard I used for my filofax page one but comes close (although that cardboard was also old packaging stuff). I was a little bit beside myself therefor I decided just to cut out a lot of tags.

You know, I am still waiting for my "Verpackungslizenz" something like a packing licence where you pay for the disposals of all the stuff you are using for packing and stuffing. You need one in germany if you want to sell thing... Besides all the other licences and stuff... and it is expensive. There is no difference whether you are selling a little bit of stuff beside your other livings or if you are a big company. Same application... (No, I don't have more than 1000 employees... and so on). Mmpf....


But as soon as I get my licence I'll open my little tentacle shop ^^ So being not in a very creative mood but still have my last year resolution to do at least a tiny thing a day, I though I could make a lot of tags. For the things I may sell one day (hopefully) or just to have some at hand for wrapping of gifts.

I cut out a lot of shapes freehand and punched little holes into them. I don't thing that the shapes have to be even. In the opposite... there is something more appaling for me in the little imperfections.


I glued black cardboard on some. For the black cardboard with the writing I just wrote with a white laquer pen on a bigger sheet and cut them afterwards. Yes, there is a meaning but I don't thing that ever again it could be deciphered ^^

On some other I started just doodling around with my pen...


Or I used the wrapping of the big Lindor balls from Lindt (Yes, I am addicted to them!). The red ones are from the Lindor with milk chocolate and the black ones from the Lindor with dark chocolate. I am not too much into milk chocolate it's too sweet for me but my exception for this is Lindor! (But still prefer the ones with dark chocolate ^^).

I cut out the pieces from the wrappings I liked and glued them down with double side adhesive tape.


...and then I doodled more...


...and more...


At the end I even made a little plastic flower (like these ones) and glued it onto one tag.


LinkWithin

Related Posts with Thumbnails