Posts mit dem Label crow werden angezeigt. Alle Posts anzeigen

Dienstag, 24. April 2012

Inspirations: Crow (Leipzig)


Oh yes, this one is a real macho crow guy! He was acting like the king of the parking space in front of the supermarket! 

And I have to admit, he is really a gorugeous one! 

I still have to grin when I see how he stands on top of the car and looked straight at the camera! ^^


Inspecting his kingdom....


Dienstag, 17. April 2012

Inspirations: Crow (Leipzig)


I got her! Look at the feathers... isn't she beautiful?


But no crow likes to be photographed...

...they really all fly away as soon as they see a camera!

PS: If you wonder how it comes that I managed to post this frequently: I just found out that I can post in advance! Yes, everybody except me was already knowing and using this feature... and I even knew that it exist... but somehow I didn't really realized it ^^

Mittwoch, 15. Juni 2011

Bigger glas magnets...


With my crow...


...and of course again the little chameleon and snake skeleton from Karen (the graphics fairy)!

I am still experimenting how to get the snake with the best effect on fabric ^^


I displayed my magnets on an empty whisky package which is made out of metal. 


Okay, without glas nuggets some stars. But I also love them :)


The horse silhouette I also created from a graphic from Karen and the tree from a foto I made.


Some stamped airdrying clay... i didn't smoothe the edges... I wanted to see the effect it created.
 

Post it's with magnets on the back... like the ones of the advent calenders last year.


...and even some colour under glas ^^

Dienstag, 15. Februar 2011

Pictures with text... the crow again


I confess I like pictures with text inside. And if you are using some stencils they are really more than easy to make. This one is a version of my crow stencil.

Just use a picture editing programm like gimp (which is freeware) or photoshop (which is not ^^) or any other programm where you can make layers on the background picture.

Just open the stencil in the programm, make a new layer and create a textbox in the new layer. Write anything you want in the textbook and make sure that the colour of the text is the same as the background. That's all. Save. :) 

Freitag, 7. Januar 2011

Silhouette cards and tags... (I love aceton transfer!)


I just had to make some cards by aceton transfer now that I have some prints from a new laser printer (No, not mine *sniff*). I thought that the combination of the cardboard and the pictures you get with an aceton transfer would go great together.

And yes, in my point of view the old cardboard with the little bit rough structure of the surface and the worn out / rubbish (a little bit vintage, shaby...? don't know the actual nomenclature ^^) look of the black ink turned out to be a real good combination :)

I made a little collection of cards...
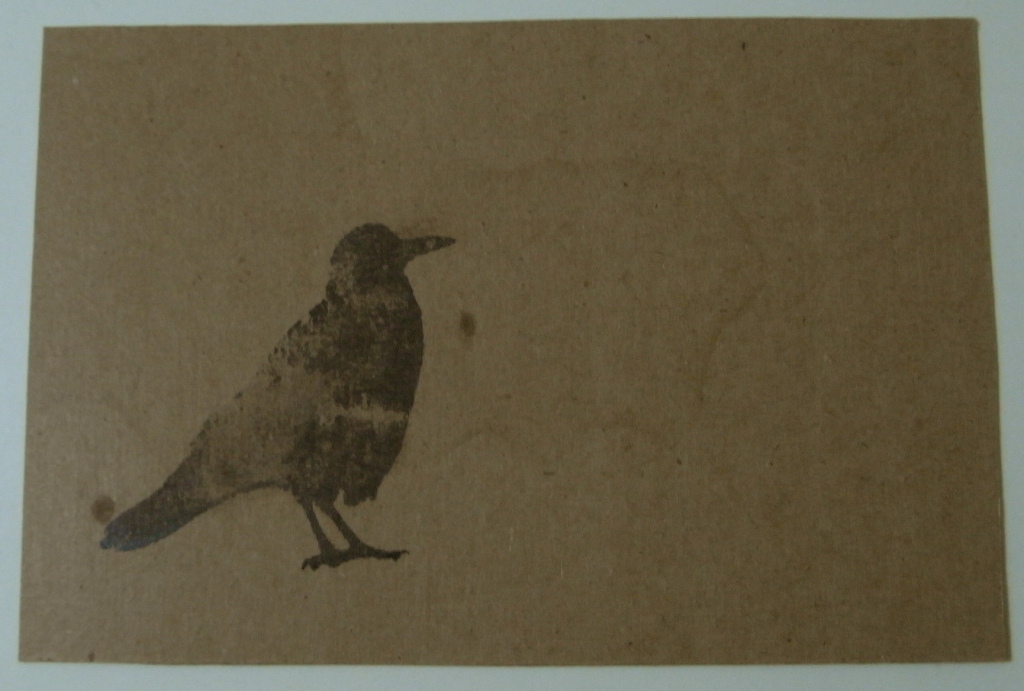

My crow stencil...


...you see my little mistake? The script is mirror inverted!


...of course the zebra isn't missing...


...one of my earlier loves from Karens graphics fairy!


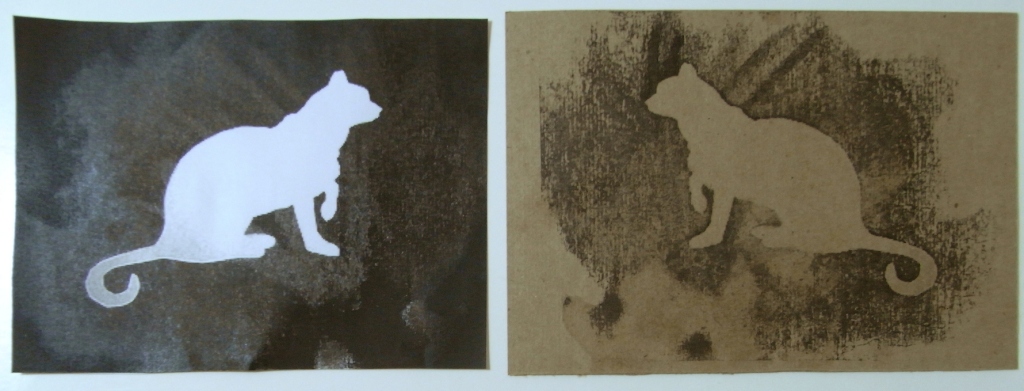
To the left you can see the print after the transfer...


I tried several different methods (or better said a little bit different procedures...). I won't write them down just concetrate on the most important thing for the transfer:

Lay your print onto the desired surface (also wood or fabric is working quite well!).
Put a little bit aceton on a paper tissue and NOT on your print!
Now you have to be fast:
Press the paper tiessue with the aceton on your print.

And I mean "press"! It is only during the first contact with the aceton (or other kind of solvent you are using but aceton works best for me) that the colour starts bleeding. As soon as the aceton dries again the colour won't ever be transferable again (regardless how much aceton you would spill over the print). Also without the pressure the colour won't bleed into your target but stays in the print.

Look at the picture below: On the left side I used some pressure but put the aceton direct over the print. On the right side I used the procedure described above.

In short I would say: Pressure and aceton should be used at exact the same time!


And of course I used some of the tags I cut out yesterday ^^

You see how my skill improved?


The horse is an image from graphics fairy. I also made the cat and the swallow stencil from picutres from graphics fairy (Oh, I just love her collection!) The crow and the tree stencil are my own graphics :)

I have a lot more stencils and things I made by using them, just have a look if you like or jump over here for how to make your own one :)

Montag, 27. Dezember 2010

The crow and all the colours!


My sister asked me whether I could make her pillows as christmas present(s). She know most of the pillows I already made as well as my love for making some (and having a lot of them on my bed!).

The first one is made with one of my crow stencils (have a look here or here). I cut the crow out of freezer paper, ironed this on the fabric and painted it over with fabric paint.

I made a pink crochet border... I like this border and thought it would be funny. A crochet border is a little bit old style but with the colours and the crow it has a more modern twist (at least I think so ^^).


It was hard work to sew with this wool because the needle was not really big enough. My fingertips are still hurting!

Afterwards I added a simple border of double crochet stiches (in german: Stäbchen) with my crochet hook (european size 4).


In made one double crochet stich in every needle stich. Only at the edges I put two double crochet stichtes in the needle stich sites. I just played a little bit until I found out which number of stichtes worked.


Yes, I had some problems catching the real colour... sighs. I haven't seen the sun now for some time and especially pink and violett are difficult to catch for my camera with artifical light. Just you know: The pink is a real pink! ^^


The next pillow was an easy one but I love the colours and the ornament! It was a textile bag I bought because I instantly feel in love with the fabric!


There was not enough green fabric for the back so I added some light blue which corresponds to the blue at the front. I am happy I had not enough green fabric because I love how this turned out! And I used red thread! Just a little touch of another contrasting colour but again: I love it!


And the third pillow: With a lot of circles made out of felt! I don't know how long this will last but I think the look of the pillow is worth a try ^^


I just cut out a lot of little circles, glued them on with fabric glue (never again, it will get a little bit to hard... they said it wouldn't get hard at the store.. sniff... quite happy that  didn't use much!) and afterwards stichted over them. Takes some time but won't be my last one!

It made a lot of fun to arrange all the circles on the fabric. :)

Donnerstag, 9. Dezember 2010

The crow bag


This is a black cotton bag I made with my latest crow stencil. It was a present (what else ^^). I cut the crow silhouette out of freerer paper with a very sharp paper knife. I got two stencils, the crow itself and the outer part. I used both stencils. Just ironed the freezer paper on a piece of fabric (black dense high quality cotton) and then paint it over with fabric paint.


The pictures are not the best, I nearly forgot to take any at all! ^^

For the quote of Samuel Beckett I also used freezer paper.

The first time I heard this quote was on the conference "25th years of HIV". It was given after a lecture about the latest vaccine trial which didn't functions but gave a lot more insight to the virus and its interactions with the host cells. Therefore even being a failure at this point in the end it may be useful for the research of another vaccine or better medical treatments. Although the quote is not in it's meaning special for scientic reseach it suited at that point...

...and for myself it suits for a lot more in my life. In a good way, after all :)

And last but not least: I like the work of Samuel Beckett!


I hope you get the idea of the little colourful circles. I liked them! The bag parts were sewed together in the end. There are two layers on each side so this is an easy but very durable bag. Perfect for books! ^^

Montag, 6. Dezember 2010

Crow stencil


Only a very short posting... This is my newest crow stencil! I love stencils... and they are so easy to make. I just took my crow picture, cut away everything except the crow itself and then adjust colour, contrast and brightness and had the base for my stencil. Print and cut it out and there you go!

Have to think what to make with this one! ;)

I love the details you get if you are using your fotos. Like all the ruffled feathers which I can't think of to draw ^^

And this was the foto:

Sonntag, 5. Dezember 2010

Inspirations: Birds in december


Perfectly hidden...

...and yes, the sky was soooo blue!


Next to the fresh white snow.

In germany we have the coldest first days of december since recordkeeping of the weather began! The coldest. Cold means between -10 °C and -20°C. Bah! In november we had a day with +20 °C! Also very unusal... but far better than the cold...!


I'm walking...


Find me!


It's cold...

´

Not for me.


Never alone.
 

Catch me.


Searching for little apples under the snow.


LinkWithin

Related Posts with Thumbnails