Posts mit dem Label mixed media werden angezeigt. Alle Posts anzeigen

Sonntag, 29. September 2019

"Foliage" - Art Elements Theme Challenge


This month Caroline chose such a wonderful theme - "Foliage". I was surprised that I actually managed to get quite a lot done because we also were on holidays this month... and at work I had a lot to do to get the huge pile done that accumulated during my vacation. *sighs*

Some of the images you may also have seen (the cat prints) since I wrote about how I create my printing plates at Art Elements ("Printing plates and art prints").

So here are my creations. There no coherent plan but rather I simply tried to get the theme incorporated in all my work and sketches. This mixed media piece started out as some card board I used to clean my brayer on top. I love the gold accents. It is a acrylic gold paint from the PrimAcryl series from Horadam and I was surprised how nice it is.


I also brought a new sketch book and my art supplies with me during travelling including my new ceramic test palettes and also the empty make up tins that I tested for their usability as water color palette. ;)

I played less than I expected but that was due to the fact that I didn't like the paper quality. It was an expensive water color sketch book, sadly not 100% cotton because they had none but a high quality one. And nope, not usable for water color. Still, it worked quite well with gouache. 


I love vintage tins!


My muted / earthy / dark palette... there are three additional wells in the lowest row with gouache and Formentera red earth water color (not on the swatch card).


My rather bright / greeny pallette also with additional gouache in the lowest row (and also not on the swatch card). I nearly used ALL yellow gouache due to the paper problem and thankfully I had a lot of white gouache in both palettes. I used it in combination with water color to get more gouache paint because that worked quite well.


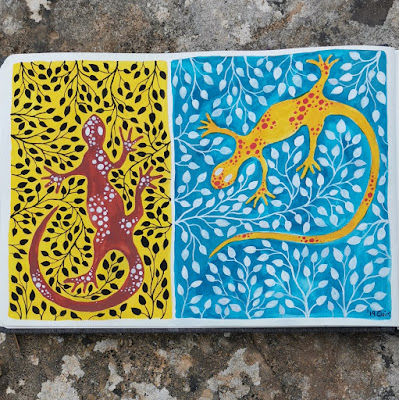
The lizards took me several days to finish simply because of all the leaves... and I had to wait in between for everything to dry. The risk running with my hand over some wet paint was... well... it happened ;)


But I so love them! They feel like summer and sunshine. I am thinking about getting some paintings done in this style as well as to scan these to and print them on thin cotton fabric.


And next to each other...


Also some simple nice studies of leaves as well as color studies.


These are the foliage inspired cat prints I wrote about over at Art Elements. My collection was short of a cat printing plate (shocking, I know!) and I combined the theme cat with the challenge theme.


The prints are done on paper as well as MDF board. The coloured backgrounds are made with gouache and the prints with water-based linoprinting ink (both from Schmincke).


The right print is without any foliage... but dots... I mean.... DOTS! Somehow they make everything better (like the lizards!).


This cat print over the yellowish/mustard background is my favorite print of all cat prints. I think I will keep this one for myself an frame it. 


I played a little bit more with gouache + MDF board + simplified foliage and am surprised how well I like this style. Sadly my camera was not able to capture the true turquoise and purple undertones so you will have to take my word that there is much more contrast in the paintings in real life (also I corrected the paint problems on the left leaf).


Since we were on holidays, I also missed a lot of the annual gel printing challenge in September from Birgit Koopsen.... but I managed to get some done. This one fits her monochrome prompt and our foliage theme! 


Thank you for joining us this month! My entries were a little bit over the place but I have to say, I really enjoyed all my experiments with paint and different styles and love the outcome! 

Please have a look at all the participants this month! :)

AE Team
Lesley  
Susan 
Marsha  
Claire  (you are here)
Cathy 
Jenny  
Niky  
Caroline


Guests
Dawn  
Hope  
Alison  
Beth & Evie  
Laurie  
Kathy  
Linda 
Sarajo  
Michelle 
Tammy  
Divya  
Karen  
Alysen  
Mary  
Cat  
Jill 
Sarah
Anita


Donnerstag, 29. Juni 2017

"All that bugs me..." - Insects (AE June theme challenge)


This months theme challenge at Art Elements (AE) was given by Diana Ptaszynksi: Insects. What a perfect topic for me and actually one that came up quite often in my work. Bet it the use of beetle wings in my jewelery or paintings or handcarved stamps.


It is a long time ago since I carved my own stamps. But since I love monoprinting, mixed media and handmade books, I wanted some bigger motives to use. I also had some new rubber carving material to try out (the blue "stuff" and new being relative meaning unopened but lying around for a long time). I love carving rubber because I don't need a press to get good impressions. But in the past I used real rubbers (to hard or stable to really carve well) or a rubber carving material at my craft supply store (at that time the only available but it sadly crumbles a lot).


What shall I say? I love it! It is smooth and easy to carve and IT DOES NOT CRUMBLE! The "crumbling" problem was one of the reasons I stopped carving my own stamps - to frustrating and heartbreaking. The motives of course insects, in this case I started with a beetle. 


Here you see my reference image. I actually cut it out in the desired size and draw the silhouette on my stamp to have some guidelines. You could also use some copy paper but test it first with the rubber. The one I had didn't work at all on the rubber surface while it worked perfectly on paper.


And printed on a colorful background (MDF) with black archival ink. Since the background was quite dark I used some coloured pencils to draw around and play a little bit with it.


Just look at the background, love it!


In my carving process I stop in between and stamp the image just to get an overall impression and see where I still have to change something.


With a lot of background and the wings not finished...


Nearly finished but with some broken lines I didn't like. Take care to really stop in between. I know myself, after the first rough carving I need a break (or start another one) and leave the fine details for another day. Never ever worked out if I did it all in one go.


Of course I also had to test them with ceramic clay. They leave a nice impression. 


I only smoothed out the outer areas where you would see the carved background lines and a little bit in the middle. 


Both will be decorative tiles (I think).


They are still drying but I am so curious how they will turn out. I will add some black underglaze to highlight the details (not covering the whole stamped image) and am thinking about a transparent glaze on the insect and an opaque around. What also could be interesting is to add some graphic designs on the background. Mh... still thinking...


After I got my love for carving back I thought also to give linocuts another try. Our professional art supply store takes care to only provide fresh linoleum for carving since it gets hard and brittle after some time.


It is still in progress but I am surprised how easy and nice it was to carve (also way cheaper than the blue rubber "stuff"). There are differences but I just need some training to adjust. Oh, and better tools...  but that is a wish for nearly any technique, nai? *sighs*

Also I don't have a printing press and just with hand pressure it really doesn't print as well as the rubber ones. But I'll see if I can somehow adjust a little bit. All these prints are still test prints in between just to see how the carving comes along.
  

You know, I have a lot of my own stamps and I was thinking to show you my older insect stamps made with different rubber materials. I also love to see how my own abilities evolved (or are not so restricted anymore with problematic materials? Who knows ;) ). 

So I went to have a look and thought, oh well, why not show you my whole collections? Here it is! (there could be some smaller ones be missing but then I wouldn't even know where to start looking for them). 


As you see I used every tiny wee bit! I so loved the big dragon fly image but sadly it crumbled (right side). It is a good material for stamps like the birds and leaves (top row, middle image) because they don't have small areas but are rather massive. But I am handling my octopus stamp with the most utter care! 


And I nearly forgot my pegasus, and my tree, and my spider, and my little owl, and my flower....! I definitely need to use them all again somehow! I hope I am not the only one sometimes forgetting the little treasures in their stash.

As a last impression: Here are all my other insect stamps I made a long time ago. As a reference I stamped the little beetle on my finger nail too.


Diana, thank you so much for this theme, it was perfect for me!
Now please have a look what everybody else made!

Guests

Art Elements Team
Claire Fabian (you are here)

Dienstag, 31. Januar 2017

Inside her head... there was a whole universe (January AE COM)


Usually I love showing you some pictures of the different creation steps of the "stuff" I create. In between being still ill myself, my husband still recovering from his operation, work, work and more work and my general winter induced low energy levels.... I simply forgot to take pictures.


This time we got a leather cabochon from Lindsay Star for our component of the month (COM) challenge over at Art Elements. If you are curious how she made them, have a look here (I also had to "steal" one of her pictures since I also forgot to take a good picture of the leather cab before I used it).


Don't you think that the all look like little galaxies? The idea of a nightsky was never leaving my mind when I pondered what I should do. Lindsay also send a lot of other little surprised along with the leather cabochon; beads, leather, fabric.... and a little wooden queen (nope, no princess, she has a scepter and the real crown on her head). Although she also reminds me of Alice somehow... maybe the style?


Seeing both together I knew I also wanted to use them together.


My table is always full of other materials and ongoing projects (nobody should visit me without a warning in advance ;)). There was the lid of one of those cheap and ugly little treasure boxes people buy as gift wrappings (to put a gift coupon or something inside). I couldn't get myself to throw them away (had two), instead I opted to take them apart... and let the parts lay around.


But the little queen and the leather cab universe were a perfect fit for the box lid. I added pages from an old book, painted all over the lid, drilled holes in the leather cab (that was scary!), added some glass drops (these were also send by Lindsay, aren't they lovely?), painted over the queen (I wanted to add my own touch and enhance the colours), added a layer of resin on her, cut the the labels from card board.... and finally wrapped and glued all together!


"Inside her head... there was a whole universe"


Please have a look what all the other participants made with the leather cab!


And thank you again Lindsay, I hope you like what I made with your treasures :)

PS: I am sorry that I am late with my blog post... I had troubles with my camera (still have).

Niky

Sonntag, 23. Oktober 2016

Letters and numbers...


Just playing with materials a little bit. Honestly, I find it still strange that there is (and was) a label for something I also already did as a child: Just playing and mixing all available materials. But it is: Mixed media. 

Sonntag, 18. September 2016

"Bloom" - ATCs


The theme over at paper artsy was "Making marks". A perfect challenge for me since I just love to doodle, add pattern, little non-descriptive writings, rising texture... an so on. On the other hand, everything you make and add by hand is actually a mark. Every single one specific just for your own style, the way your hand moves... So an easy and difficult challenge at the same time ;)


I created 2 artist trading cards (ATC) although I have to admit that maybe the size is the only thing fitting with an ATC since I am tempted to keep them to myself ;) I called them "Bloom" in every sense and meaning of the word, literal as well as metaphorical. 


I used the same stencil for the flower part with a little bit of molding paste. The background was made with gelatine monoprints (I make my own plates). 

By the way, there are a lot of iridescent and metallic paints used so in some images some areas may look overly bright, just the light reflecting on the painted surface.


The I added some writing, marks, more colour, inks drippings, some new spray I got (the red enamel-like raised splatters) and more...


Thankfully ATCs have such a small size. Since even with this small size these two ATCs took a long time until I felt they were finished. Even now I am not absolutely certain but a deadline is also a good reason to find the stopping point.  


Love all the colours, marks and texture! The colourful pieces at the right upper corner of each card are by the way some "acrylic skin". Not done on purpose but I have a plastic folder under my painting area that I also use as a kind of palette and the acrylic paint went on it layer for layer... until I was able to peel it down! 


Now I will even keep my leftover dried acrylic paint on my working space ;)

LinkWithin

Related Posts with Thumbnails