Dienstag, 28. September 2010

Jelly teaser ^^


And soon also a tentacle teaser ^^


Just some impressions of the dishes I paint for Lachafa. A collection with jellys and tentacles. What else?!
I will get you all the pictures as soon as they are finished but just as a little life sign for you (so you know that I am doing stuff! - keeping my word).


Okay, I won't even try to explain this joke. Let me just say it is some family stuff and it is (at least for Lachafa and myself) a funny as well as strange one. Translated it would mean something like:

I am the monster.
I am the blobb.

You are the monster.
You are the blobb.

Blobb (or just blob)... like the slimy things in old horror movies! Which eats and destroys and assimilates everything on its way!

Sonntag, 26. September 2010

Lachafas World!


...yes, there is a missing part but she ran out of paper. Tomorrow she'll get more paper and finish her world map ^^

The only thing we need now is somebody who makes a patchwork out of fabric to go with the paper patchwork!

(No, I still can't. Foot ist better now but not good enough to use my sewing machine... a cold turkey for me!)

Samstag, 25. September 2010

Mail art - Tentacle cards and fish envelopes


The fish on the envelope is from graphics fairy (No surprise ^^). I made the envelopes like the last ones (just have a look here and / or here). The air bubbles are painted with acrylic paint and the outlines of the fish is overpainted with a black pen. This brings the fish and it's shape really out! Gives the fish more contrast :) (I also used a little bit more black at the scales)


The background paper was the one I made accidently by painting on fabric (have a look). I ripped small parts out of the paper and painted black tentacles with acrylic paint over it.


Look at the details! Although it is black on black there are a lot of little suckers painted through the structure of the used paint :) I love the effect you can get with acrylic paint.


Mittwoch, 22. September 2010

Pendants made with stamps...


This was made with an old wooden fabric stamp. I had some leftovers of polymer clay (Fimo) which I just wanted to use because it became a little bit hard already. I made circles out of fimo, stamped them and baked them. Afterwards I used metallic acrylic paint with a brush to go over the surface. I love how it comes out. Especially the little "flaws". :)
This ones are really big! They have a diameter from 4 to 5 cm. I want to use them on my small bags as ornaments on the outside :)

 There are holes on every side so I will be able to sew it tightly to fabric!


And with the little leftover I had I used my coffee themed stamp. It was a mixture of colours (you can see the green spots I carved free!) which I overlayed with a lot of different acrylic paints. Gold, black and then bronze and then just scratching with a knife going over all the layers of paint.

Fish on the wall


There he is. Hanging on my wall. Graphics fairy had a new fish print on her blog which I just love! Not too detailed but detailed enough to be so cute (Yes, maybe my definition of cuteness is not agreed with everyone ^^).

His new place is next to my white board and the orange / red little octopus. The octopus had to put of the reach of my cats because they loved him too much ;)


I printed him out as big as it was possible with DinA4 and glued him on cardboard. Afterwards I just cut him out.


I used a black laquer pen to paint all the edges in dark black and also overpainted some printed lines to get a darker colour. The only other touch I added was silver artistic water colour. It is a little bit difficult to see on the pictures but the shimmer is really cool and "fishy"!


You see the silver and the darkened lines?


The back I also painted black, this time just with the water colours. 


I glued three layers of foamed rubber together and to the back on the fish. With a poster glue stripe I put it on my wall (it is sooooo light!). You could also use a pin or a nail.


The play of light and shadows creates the effect I love of things hanging on my evergrowing picture wall!


He looks at you!

Birthday impressions


Okay, I miss my mark by not doing very much creative stuff the last few days. But...! It was my birthday on monday, therefor you will get some birthday impressions ^^

With tentacles and eye balls!


Sonntag, 19. September 2010

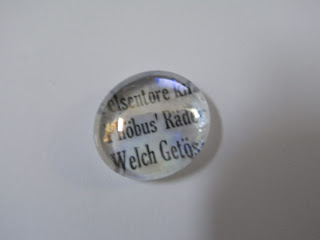
Little "written" glas stones...


Everybody uses this little glas nuggets to make cool decorational stuff. I love them (and it is years ago sinced I made my own ones)! So I was infected again and I made some with writings. I found some clear and light blue glas nuggets (I found more but the rest was not transparent enough to see something through the glas).


I just put the glas nuggets on a printed script, marked the shape around the glas nuggets, cut the paper piece out and glued it under the nugget (I used a transparent gemstone glue pen which was really cheap ^^). Afterwards I added a layer of white acrylic paint and that was it.

I love this magnifying glass effect especially on this non readable old script ^^


Beside the old script I printed some writings in a bigger size and searched for some word I liked in it to put them in the center and therefore "magnify" them. The basic (if you are curious) is Goethes "Faust II" in german.

Phöbus´ Räder - Phoebus´ wheels


Mondes - of the moon
  

Stern an (Stern) - Star at (star)
Funken - spark

I think the little flaws in the glas make a special effect :)


Together with some more :)

Dämmerung - dwan / twilight
Erdgeboren - earth born (earthlings in the english translation I found)
Elfen - Elves


The can be put on magnets, on card, on gifts or collages... or just be used as they are. I like to make some with a special meaning for other persons.


Donnerstag, 16. September 2010

It takes more than one swallow to make a summer...


...and this summer is ending. It started to late and ended to early. But at least here are some swallow stencils. ^^ The make nice cards or would look great on the wall (either painted or cut out on cardboard or wood).


The swallow pictures I used are from graphics fairy. :)

(Arghs, all my blades for my paper knife are used! Need new ones! No more stencils until then *sniff*)

Mittwoch, 15. September 2010

A little how-to-do for your own stencils...


...and my newest favorit one! Look at the cute (Yes, I think he is cute ^^) grashopper above! I took one of the pictures of my inspirations: critters (botanical garden Leipzig) and converted it to a black and white image. Just use the image editing functions programms like word have integrated. Better ones are not necessary for you just want to make a stencil out of it. I play a little bit with the contrast and the brightness until I see the lines I want to cut.

The grashopper image:


In b/w and printed:


Most of the lines are easy to see and therefore to cut. But some points are a little bit difficult and have to be modified (hope you see the circles, if not: just enlarge the picture!):

All pieces have to be connected to each other. If not you can either leave a little connecting space (red circle) or move the object a little bit (green circle, originally the legs were crossed!). And if a little detail is missing just add it! Like I did with one of the legs (blue circle).


And another example this time a flower (Inspirations: Flowers (botanical garden Leipzig)).


Printed after some modfications (contrast / brightness) in b/w


Cut out


The negative image


The positive image


If you are not satisfied you can easy modifiy a picture like this. For example if you would prefer that all petals are to be seen separately just cut a line between the two connected ones. Really easy. And don't be frightened to lose your worl. Just make pictures of your stencils and print them out again! This way you can keep your original one and try out a lot of modifications of the shape until you like it :) Also a way for creating stencils with different sizes. Make a picture and print it at the desired size. All what is left to do is to cut it out again ^^


The next one is take from my collection Formentera: Critter. Here I just added the missing tail. I made it a little bit more curvy ^^


And the gecko... think I will change the head a little bit but not now (as soon as there is a specific project for ^^). But the movemont in the body is great!

LinkWithin

Related Posts with Thumbnails