Samstag, 28. Dezember 2013

Polymer in pink and some advent calendar impressions


This box was made for the pink advent calendar. So of course I can only show it now to you (all the little packages safely open now). I used fimo classic, swaroswki stones, paynes grey and magenta acrylic paint (Reeves) and last but not least swellegant silver (Christi Friesen) for the accents on top!


It was difficult to try to catch all the depth of the colour and especially the great pink purple shades. This was the best I could manage but believe me it doesn't do reality justice :)


Some side views! 


And yes, I made advent calendars. Also, like every year I forget to take pictures in time ^^ So here are just a few impressions!


With little number tags made out of polymer clay... 


One for my parents, one for my little sister, one for my little brother, one for Rumpel and a pink one for a dear friend of mine :)


Dienstag, 24. Dezember 2013

The first christmas present from me this year :)


Even if I already draw the winner of my little giveaway... between baking and wrapping presents and having some coffee with friends... I didn't manage to post ;)

So for a christmas present after christmas (I am curious how long it will take for shipping :) ) the drawn number was 4:

What wonderful directions! You answered some questions I have had in my mind. I would love to win these beads.

I wish you all happy christmas and a happy new year!

Sonntag, 22. Dezember 2013

Inspirations: On the streets (Leipzig)


You see: I took the foto while it was still autumn around here and the trees just started to get all their glorious coloured leaves. But I realized just now that I never showed here one of my favorite sculptures in Leipzig! This rather steampunk like bacteria stands in front of the BBZ (Biotechnologisch-Biomedizinische Zentrum, Centre for Biotechnology and Biomedicine). You see the genome? ^^ The surface created out of rust is just stunning!


Samstag, 21. Dezember 2013

Under the sea...


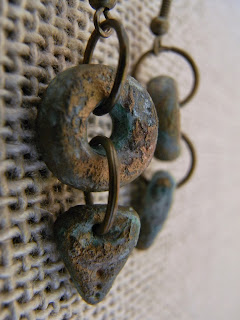
Yes, this is also polymer clay. I made these bead out of polymer clay and then used swellegant brass and different patinas to create this old metal effect. They could have laid deep down under the sea for a long time... For me they look tribal and I definitely keep them!


All the other things I show you were in the birthday present for my sister. I already prepared this blog entry and... ehm... forgot it because I know I could just show it after her birthday and somehow during that time it fell out of my mind. 

She lost her octopus necklace so I found another one for her. She really loved it. This one is smaller, thought, so I added some czech glas beads I got from the curious bead shop. 


All the shades of green and blue, like sea water and foam...


I also added a pendant. Normally just a ready to use leaf but I added swellegant brass and patina to get this gorgeous surface.


And I also got some little tentacled ones, so easy and cute earrings! The next time I will add some patina and beads but to be honest I also loved them simple as this.


For these leaves I used swellegant copper paint and patina. It makes such a differences and I love both effects!


These leaves became also earrings. 


Here just a last image how they look in direct sunlight!


Freitag, 20. Dezember 2013

Inspire! - Polymer clay box


You see the impression of the word "inspire"? This was made by a letter noodle stamp I made! ;) Just glued letter noodles on a blank surface and had my little stamp. It is really strange how the simplest ideas are the ones that have the biggest impact (at least for me and at least outside the lab ^^). The other structures you can see are made by my own pattern stamps (made from various surfaces I found, like the speakers, laptop, chairs...) or wooden fabric stamps. If you look at the box you will always find new structures the longer you look at it. 


I used paynes grey acrylic paint (Reeves) and inka gold (Viva) in shades of blue and green for the surface. The metallic quality of inka gold is really stunning but you have to take care that you will seal the colour carefully because it is not waterproof. Oh, and I added some feed to the box! 


PS: For the german readers: This is a pulmoll bonbon box!


Donnerstag, 19. Dezember 2013

Hammered texture - silver earrings


While I was in the 9th class we had to have a work internship (this was still in Bremen, I had another one in Leipzig because they have it at the 10th class). The wife of my uncle was a goldsmith (he is a silver smith) and I was allowed to work in her workshop. She taught me to saw and file and torch copper and silver. At first just copper until I learned at least the basics ;) I already showed the things I made here. So after seeing some weekend workshop to work with silver I was happy to be finally able to play again with metal and have all the good tools available as well as some good guidance and help.


After I finished my first earrings (that I can't show you because they will be a christmas present) I searched for some inspirations and tutorials and found this one from objects and elements! So I went for it, just changed the overall design a little bit for myself and am really pleased with the outcome. I love the tribal style quality :) Of course I spend the leftover time playing with surfaces and made the little silver beads below as well as the little closure from a leftover silver wire piece. 


Sadly silver is quite expensive... sniff! But the good side: The workshop has open days once a months where you can come and work there (and it is not really expensive!). More to play ;)


In the woods - polymer clay ornament tutorial (and giveaway :) )


Here is the tutorial for my christmas ornament I made for 4th annual ornament blog hop from art bead scene. This was the first time I participate after just seeing all the beautiful pieces every year :) Above you can see my "production line" for christmas. I want to give them to family and friends this year and hoping to create new ones every year (at some time one has to start, nai?). 

I made a mold with a stamp after falling in love with the image of the stamp. Normally I would not have bought this stamp, too expensive. But you see the tree sceleton, the little owl and deer and it is snowing...?! 


A clear case of: Want!


But I am not a fan of impressed images at least not if you have a kind of landscape. Somehow trees and animals have to come "out" of the clay and not go in. Not a problem with patterns just with rather living things and as said landscapes. So I made a mold from the stamp with super sculpey firm. I think you can use any other polymer clay that is a little bit harder like fimo classic (but not fimo soft for example!). But this one I bought for Rumpel because he found fimo classic still being to soft to create sculptures and I have to say this clay is really, really great! Only available in grey but really strong and hold fine details perfectly!


The easy part: I stamped into a layer of super sculpey firm. You can see that I pressed a little bit harder at the lower part but that was okay for me. Bake! There is your mold :) I nicked the mold at the top to know the direction after I press clay into the mold. 


Because polymer clay likes to stick to polymer clay, especially in tiny structures, I use talcum powder (Penaten is a talcum powder for babies) to be able to remove my raw polymer clay from the mold. Because the mold has tiny details I add the talcum powder NOT directly to the mold but onto the clay before I press it in the mold. Otherwise you risk to put too much powder (even fine one as this) into the little details and block your mold.


Uhm... can you see all the dust and dirt I managed to get on my white polymer clay? I used Fimo classic in white by the way. Between taking pictures and kneading the polymer clay I managed to get dust on my working space. But other than looking bad on this image (that I show on my blog for all the world to see... *blushing*) it doesn't matter. It is just on the surface and later on I will paint and sand the piece. All the dust and dirt will be gone!


Press your polymer clay firmly with your finger tips into the mold. Make sure you really pressed at every area. I like to go around with my thumbs over the surface, starting from the middle to the outside. This is also the reason why I made the little nick / mark so I know where the top side. While pressing the clay in I am moving the mold quite a bit and if I want to write something at the backside I want it to be upside. 

While the poylmer clay is in the mold, I start to work on the backside. You can use stamps, texture sheets, write on top with a gel pen (it is water safe after drying and the gel paint goes really good into the clay) or just press in any kind of pattern like I did here. I used knitting needles (best polymer clay tool ever!), an old tool from my zoological class and the back of a paint brush. 


I carefully remove the piece from the mold and put a hole at the top with a knitting needle. I always go from both sides to have a smooth hole. If you are afraid to disturb your image while doing this: Put the piece into the freezer for some minutes before you make a hole. You could also drill a hole after baking with a dremel.

Of course: Bake!


Here are the backsides of my other "In the woods" ornaments I showed you on top. Do you see the one backside with the letters turned upside down? Yes, that was the reason why I made a mark in my mold ^^As you can see I use really everything I get hold of. The backsides itself make beautiful ornaments.


Some more details... freeform pattern and clear silicone stamp...


...and even more... old jewelery pressed into, wooden fabric stamps, classic rubber stamps...


To add colour I use acrylic paints. My favorite brand is Reeves. Not too cheap, not too expensive, has a really good hold on polymer clay and such bright and good colours. I choose two colours (sometimes three but not more) for a single ornament. I randomly apply both colours on both sides.


Make a mess and enjoy it! I use old plastic lids for my acrylic paints that also allow me to mix or water down paints. Here I used blue, a little bit of white and purple. 


I remove most of the paint with a paper towel as long as it is still wet. I am not too accurate, I just want to remove a large amount but the fine details I am doing by sanding the piece later on. The backside...


And the front... Just let it dry before sanding. Otherwise it will be a mess. Yes, I already was impatient, happened to me. 


My torn sandpaper... and after sanding: Wash the piece to remove the dust, let it dry and then you may add some protection with gloss or renaissance wax or whatever else you like to use with polymer clay. You could leave it like this but I am afraid that the white would be stained to easily. But I don't know if this is really true just pure paranoia after putting so much work into one piece ^^


And after sanding! Now the contrast is really nicely enhanced. Also all the little stuff sticking to the clay is gone! As I said, don't worry to much!

Finished!


And the backside a little bit more sanded. Not too much, I like the rough edges, but enough to let the white colour pop out more.


Oh, and by the way, I also tried the mold to make little owl earrings. I still have to put some layers of gloss on them for protection (and also sorry for the blurry image but it was difficult to take pictures in the middle of the night and they started to roll all over the place... mph! ^^)


But you know what? Christmas is around the corner so why not to have a little giveaway? If you would like to have the "bead" in the woods I made here for the tutorial and also the little owl earrings (finished of course), just leave me a comment! Let's make it a short one: I will draw the winner on sunday, 22th of december, at 14 pm CET. I know that the shipping will take longer than christmas but hey, that would be something to look for after all the christmas presents?! ;)

EDIT: Sorry I didn't write it down! Of course this giveaway is open to everyone worldwide as long as the mail service offers delivery (the german mail in this case) :)
Also changed the picture of the owl earrings, they are finished now. I still don't seem to manage a good foto... I really need a new camera! Next year I'll get one.


Mittwoch, 18. Dezember 2013

Shape and colour - all the difference


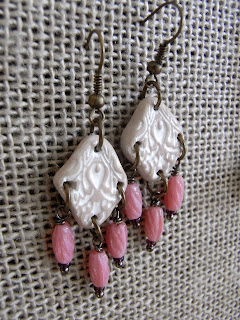
I already told you about the old czech beads I got from Rumpels mom and even showed you some of them in the past. Here are the little light pink beads. I am always surprised to use the description pink in english because in german pink is really just the bright magenta or Barbie pink and this light colour would be "rosa". ;)

The basic colour of the polymer clay I used for the beads of both earrings is sand. But in the upper ones I combined it with white acrylic paint and in the ones down below with raw umber. I just love the differences you can get only by choosing the contrasting colour. And if you saw my pink earrings from yesterday, yes, the same ornaments on top. I use old jewelery to make molds and pattern stamps out of them, shaping the bead form after setting the impression in the clay.


And here the picture of the whole length. I love the strong colour accent with the red swaroski and dark purple facetted glass bead.


Dienstag, 17. Dezember 2013

All the beauty of aged flowers...


This little ones are one of my favorite earrings now. The little metal flowers are covered with swellegant brass and then used with a lot of the patina (from Christi Friesen). Oh, I changed their form before I added anything. Normally the upper flower petals were even, I just curled them back. I wanted to use them as a central bead in earrings so the flat version was not really fitting. 


The light blue glass beads are at least over 25 years old if not way older and from czech. I got them from Rumpels mom (I already used the beads I got from her several times so you may remember them if you read my blog already :)). Just some bronze glass beads (very irregular shape but I so love them!) and these gorgous green czech beads I got from the curious bead shop

LinkWithin

Related Posts with Thumbnails