Mittwoch, 31. Juli 2013

Blue glas


I am always surprised how different a pattern can be regarding to the colours and shapes used. This time white polymer clay (Fimo classic) and blue acrylic paint (Reeves), covered with fimo liquid and several layers of shiny gloss / lacquer. For the gloss it is really important to make at least fve or six layers to get the glas like effect.


I am surprised how much I love the deep blue! It says portugal or spain to me, summer with all the white and blue, the beautiful tiles (morocco would also be suitable) and patterns... Makes me smile :) 


Dienstag, 30. Juli 2013

Broken gold


Polymer clay (fimo classic) in a dark brown, gold leaf (no, not the real one, just golden cheap metal but still so beautiful!) on top, crackled by rolling over the clay, covered with fimo liquid and a lot of layers of shiny gloss! 


Montag, 29. Juli 2013

Grey matters


Simple. Dark grey and silver on white polymer clay. The pattern was made form a plastic place set ;) I am thinking of more bold colours for this pattern, a little bit retro style or just pure summer feeling? Or rather a metallic look...? Mh... difficult....


Sonntag, 28. Juli 2013

Strings and loops - use your yarn for earrings


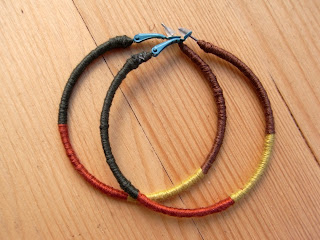
There is nothing as good as fast and easy little projects. Okay, skip the fast. They are not fast to make. But still an easy and good project to take with you. Rumpel found some cheap and furthermore discounted jewelery in our supermarket. Knowing me (or rather even knowing me? ^^) he showed me the offer. The earring loops were only 59 cent (euro cent, not us cent) so I took some with me. 


I had a lot of embroidery yarn / thread at home, chose some colour combinations I liked and just wrapped the loops with them. The open ends are wrapped under the yarn, just for the end I made a knot and secured it with some glue. 


My sister Lachafa used this technique to cover her ear plugs with yarn (have a look here). Later she gave them away to our brother because he also love them. Just wrap whatever you like, secure the end of one yarn under the wrappings of the next one.

And if you don't like it anymore: Cut it off!


The original earring loops... and yarn...


I could also image to use different colour combinations for each ear. 

By the way... the even reduced the leaftover jewelery down to 29 cent. I bought 17 earring loops, all that I could find! A lot of them are smaller loops, but I think that will also look nice with yarn... or polymer clay...?


For the readers speaking german: I linked up to frifris blog! Mh... even if you can't read german, have a look at the blog and the linked blogs. They have a topic each months playing with fabric. The topic of july was threads. Seeing a necklace at Nahtzugabe also made by wrapping something with yarn I thought my earring would fit in and asked whether I could join this month :)

Per Zufall bin ich beim Blog Nahtzugabe über frifris "Stoffspielereien im Juli: Fäden" gestossen. Bei Nahtzugabe kann man eine Kette mit "Garnumwicklungen" und ein Makramee-Armband sehen. Ich fand, daß paßt perfekt zu den Ohrringen :) Deswegen hatte ich angefragt, ob ich diesen Monat auch bei den Stoffspielereien mitmachen kann... selbst wenn es eben mit Ohrringen ist! Hier könnt ihr die anderen Spielereien sehen.


Yellow and I - that is a real challenge!


I really like to challenge myself. That has a lot of reasons and not the last one is to get the head free from worries, sorrows, too many thoughts biting in their own tail, just stress (even the good one, on a certain level it is so hard just to relax and calm down)... Just reading a book, drinking coffee with friends, watching a movie, go swimming... all great, but that all don't turn the stuff in my head off. But a challenge does. Working with the hands, creating things, the concentration at the moment...

But for this there has to be some kind of challenge for myself (or also new stuff and techniques and material, woks also great ^^). For all the colours I am working with, for all the variations of polymer clay I have, I realized that I don't really use yellow. I like that colour combined with red and orange in my apartment, on pillows and throws... but not in my wardrobe and not in my crafting. I am never drawn to yellow.

There we are. Yellow. Okay, I thought, lets buy yellow polymer clay and start making something. I bought a nice saturated yellow fimo classic. 

Two weeks ago I meet with friends for a crafting saturday (with sweets, fruit salat, Hugo and prosecco). We all made beads and earrings out of polymer clay, joining the materials and experience we have (I would so love to give workshops here in leipzig, but I still didn't find any oportunity with working spaces and everything...). I took my yellow clay with me and started...

...and it took me until now to finish of painting the beads, adding gloss or resin, and especially: Make something with them!


Here we are with my two first earring pairs made with yellow beads. Okay, I added other colours with acrylic paint (Reeves) but I don't like just raw baked clay. I prefer depths I can create with adding layers of different colours. 


For this little round beads (that are now really going into orange rather then yellow but I think the yellow is still prominent, nai?) I tried a technique from Kellie (Make it with me, have a look here) with pastel chalks and varnish. I scratched a little chalk dust with my scalpel of the chalk and used the shiny gloss from staedtler for fimo. I added some bright orange and red. Here a view of the back.


Also a first time for me: I used waxed linen cord and sewellegant paints. A lot first times in one and all of them just add a little subtle element but creates something that I really like. The metal rings are treated with some oxides from swellegant (the selection of metall coatings and oxides from Christie Friesen, made by Sculpt Nouveau). From the waxed linen cord I bought several colours as well as her sample pack for different strentghs (2, 4 or 7 ply) from Rebecca´s "The Curious Bad Shop". My biggest love is the teal one I used here!

Another real subtle effect that you just would see if you would change it: The silver beads. They are from the bead shop "Perlament" in Bonn. The name is a word play from the combination of "Parlament" and "Perle" meaning parliament and bead in english. Bonn was the former capital of west germany before the reunion of east and west germany. The beads are so unbelievable expensive but worth it. Sadly they don't sell online. A friend showed me this beads and she tried (I also tried) to get from any other company this beads. No way. It seems that they are covered in real silver somehow. They also have different kinds of golden beads... also real gold... going up to over 15 euro for some gramms. And yes, we just drove to Bonn to get beads... even if it is on the other side of germany...


For these beads I just used a red acrylic paint and covered it with (yes, you guessed it, another first time, this blog entry is kind of long...) UV resin. Uhm, I got little air bubbles, but still, you don't really see them and they are still beautiful. 


What took the most time: Find suitable beads to add. Red and yellow glas beads (round or swarowskis or lampwork) all seemed way to "matchy". It took away the whole effect of the bright yellow and red and I always just got an old feeling. I tried to add some bright contrast and it worked for a turquoise and silver glas bead I had... but I only had one left. That is strange because I always buy beads in two in case I want to make earrings with them. Then a friend suggested copper beads and these were the ones I finally used. They had really big holes so I added small red glass beads to cover them. I like the accent they are making. Can you see how the are going a little bit into the big metallic bead?


Oh, and I made a new mold for these beads. Using an old and cheap spoon I found during our poymer clay crafting session. It was stamped cheap metal: Perfect to make molds from both sides! This i why I have a negative and a positive image bead. Did you notice that the beads are not the same?


And can you see the little air bubbles? (I hope not ^^)

These earrings will also be my entry for the AJE Earring Challenge from Art Jewelry Elements. Have a look at the blog for the earring challenge as well as the Pinterest board!


You may remember this pattern. It is one of my favorite patterns :)


And here are all the beads I made in their true original yellow colour. No, I didn't use all of them now. But I promise to use all of them, it was (is) a challenge after all!


In all details...


...different shapes, stamps and molds...


...oh, these are made with a transparent yellow, not mine, a friend brought it with her at our meeting...


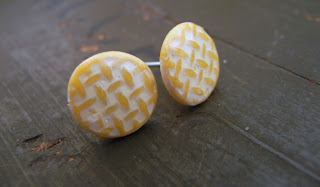
Little ones for earring studs!


I forgot to take pictures without colours, so at least the beads before I turned them into earrings.


And studs! I love to use the to try the effects I get from different pattern and colour combinations!


...or just yellow acrylic paint as yellow accent instead of yellow polymer clay?


Puh, to be honest, while I love single beads / earrings I made with yellow, it is still not my colour. I thought maybe after this challenge yellow and I would be more compatible with each other (happened to me with bright blue and pink before), but no. Or maybe... let's say a tiny wee bit better but still no big love. 

But I will thing of yellow as a tiny accent and / or contrast for other colours now ;)

Sonntag, 21. Juli 2013

Random pattern - try it all on one


This one is simple. Or not. May depend on the viewpoint. I also already made these earrings last year and just forgot to take any pictures. I made some simple disks by hand with polymer clay (this time I can't remember whether I used fimo classic or soft because at that time I was still using my leftovers from fimo soft). Then I just took randomly any of my structure stamps or pattern stamp laying around (uhm... yes... like I wrote it... laying around... everywhere...). I used black acrylic paint from reeves to set the contrast with the structures and several layers of shiny gloss. 

They are beautiful in their worn, nearly broken look. Sometimes it is good to look back at older creations. Sometimes to see how much one evolves... sometimes to see where I already took it a step further... and just forgot about it ;)


Dienstag, 16. Juli 2013

Catch it all under glas


I am still fascinated by these earrings. I made the beads last year. They are made from polymer clay (fimo classic). You can't see the real colour anymore because I stamped it with my structures and pattern molds, with everything I could find lying around me. I added eye shadow powder on top before I baked it and added and removed layer after layer from acrylic paint. 


On top came a layer with liquid fimo... and about five, six layers of shiny gloss. I made them and I am still not believing that they are made from polymer clay...


Montag, 15. Juli 2013

All the beads - earrings made for me


A friend of mine is really good with beading. She makes gorgeous earrings (and also showed and taught me a little bit, for example how to make this) and necklaces. She saw my "abstract letter earrings" and liked the shape and the colours. She translated them into these beaded earrings. A beaded tube with dark shimmering green (on top and base a row of silver plated beads) combined with a silver ring. 

Now they are mine! There is nothing like earrings made for you :)


Sonntag, 14. Juli 2013

Sparkling! - Make your own earrings studs (without any challenge ^^)


Okay, it is sunday. Here comes one of my fast little projects.

There is nothing special about it: Just easy and fast with a beautiful result! Perfect to make together with friends and family, teeny girls or people who say the can't craft at all (but love the results).

I have to admit: You need to buy the basic earring studs, the fitting glas cabochons and some sparkling colour (or paper or in my case just pure nail polish is needed). And don't forget the glue!

Can you see the gorgeous colours and all the sparkle?


It was really hard to catch all the shades of violett and blue with the sparkle in a picture. Still even more gorgeous in real life :)

What you need:

- earrings studs (I used the smallest available fitting for 8 mm cabochons)
- fitting glas cabochons (as said 8 mm)
- nail polish (or other colours / glitter / paper)
- glue


I also preffered the antique bronze over silver. The small cabochons are too cute. I will use them also with polymer clay. 

These are my nail polishes. Summer attack from P2 in 040 Hot berry and 010 flirtin' purple (I need all the other colours but coulnd't find them anymore... they were a limited edition I just found during the sale... if anyone has the palm tree green, please, I want it!) and from chanel 529 graphite. 

I get a chanel nail polish as a birthday present for some years now. Always with the special colour of the year. I love all the colour even if I just use it during holidays in the summer time. Working in a lab makes the use of nail polish at a every day basis impossible (the desinefction kills every polish... and also my nail ^^).


Now for the (short as possible) tutorial: Paint the back of the cabochons with the nail polish, let them dry and glue them into the earrings studs. Finished.


Nothing special but it makes fun to create them and they are really a perfect project to make together with others especially people not so used to create / make things.

I also looked around for beautiful paper and the effects I would get with my glas cabochons. I found some advertisement for chai tea...


The faces would look so weird! I am thinking about combing them with polymer clay...


...of course, always a favorite everywhere, letters...!


Now back to the studs: In red-orange-gold (hot berry) and silver-grey-green (graphite).


And my favorites: Blue-violett-purple!


Yes, a lot of pictures... but I already deleted quite a lot!


LinkWithin

Related Posts with Thumbnails