Mittwoch, 28. November 2012

Bird ornament card


I cut some card board elements to create ornaments... and thought I should draw myself a template for the future. Like the one I used for my felt birds (have a look here and more birds here). 

But then I thought... mh... looks cute as it is, why not make a postcard out of it? So here is my bird ornament card! To make your own little bird ornament ^^

My will go on its way tomorrow!

If you want to make your ow: Feel free to print my bird :) 


Inspirations: On the streets (Leipzig)


A cat at night on the streets in leipzig...! I didn't want to light the image up. It was taken in the dark with this umbra shade and I like it just as it is!


Freitag, 23. November 2012

Polymer clay leaves black and white


I made the leaves for a challenge. But knowing me (and the fact that I wanted to take part in one of their challenges for months... and never did it) it is quite possible that I won't be able to make it the next days. 

But still I want to show you the leaves. There were not intended this ways but developed while creating them. I used polymer clay (Fimo classic white and translucent). I used some with tiny bits and little bit of dirt, you know, the polymer clay leftovers. I thought it is not necessary that the clay is perfectly clean. On one side the clay should be painted... and also it would create more depth into the structures and shades.


I pressed real leaves into the clay and then cut lines around it for an oval shape. They were nice... but after baking I thought something was missing... 

...so I started carving the little leaves. You see the borders? All cut with a sharp scalpel! 


You see the tiny dots where the clay was not perfect anymore? Especially with the translucent... which is not perfect translucent therefor.... but for the leaves a really good effect!


The little yellow brown spots you see here were from the leaf! Somehow they also changed the clay... you can see it in the painted leaves. At some spots the acrylic paint coloured more intense than in the rest...


Cutting the edge makes such beautiful leaves! If it just wouldn't be so much time intense work!


Several trials, some straight, some a little bit curvy...


Just a thick layer of back acrylic paint at the and and taken away before it could dry...


Now I should start working with them...


Donnerstag, 22. November 2012

Structures and colours - earrings


There is something about the shape of these earrings that really works for me. Not straight edges, not really curves... 

The surface of the structures I painted with my finger tips and copper and bronce acrylic colours (Reeves again, most of the avaiable acrylic paint metall colours don't work so well but these ones are great!). Then I covered it with white aqua acrylic colours, it works like a kind of wash and the paint flows in the deep structures.


...and how the sun light plays at the surface! 


Mittwoch, 21. November 2012

Inspirations: Destruction and numbers (Leipzig)


It was such a strange view... somehow with its own beauty! So I had to take some pictures :) This is the old exhibition center in leipzig... or rather exhibition grounds because it covers a huge ground and a lot of buildings... or rather covered... 


Dienstag, 20. November 2012

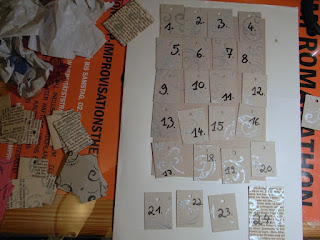
Advent calendar 2012 - ongoing process


For a long time now I make advent calendars. It started with my sister and my brother when they were really small and I just a teenager... and I just added people which are dear to me on the list. Our parents get one together and a friend of mine gets a special advent calendar with the one and only theme in all the years: pink! 


While collecting stuff and sweets, stamping and glueing the tags... I realized that one person is missing on my list: Rumpel. We started our relationship in january this year, so this is really a first one ^^ (the one above is the one for him! Already hanging at the wall in the kitchen)


Old book pages (the colour is due to real age! No way to get this by any painting!) glued on card board, stamped card board...


You see the beautiful silver in the black? First I put a little bit of silver ink on the stamp and then went over with black ink.


I also stamped black on pink cardboard or silver on the old book pages. I like the vintage look. 


For my brother (tophino) and our parents I made little paper packages with old music sheets from rumpel. He had some printed on white paper and some on recycled paper.... I hung them at the key just to keep them out of the way and safe. Now they are already in the kitchen at my parents home! Just forgot to take pictures...


...more tags...


...music sheets...


...you see how great the silver ink is? It really reflects the light!


I also packed the advent calendar for my sister Lachafa. From five advent calendars for six people... four are finished! 

Wrapping is really time consuming!


Montag, 19. November 2012

Textures / Structures / Colours


Just a little playing with polymer clay (Fimo) I did. I made a little sheet from white fimo classic, stamped it with my different textures / structures stamps. I use everything which I can find! From little metall findings to natural stuff to the brush next beside me....

The next picture I took in the direct sunlight. Not the best to take pictures but you see the colour effects way better!


I wanted just to have an example set for the colours I am using. Sp after baking I went over with different acrylic colours (also different brands). Some of them were really thick and it was not easy to remove them... others were so thin I nearly removed all... That means a lot of options for different projects!


I just wanted to compare the colour effects therefor the lines I cut are not even. But I have to say I like the look. Maybe making some cards like this! For some colours it is difficult to see the difference in the photos but they are very prominent in real.


I will make more of the text tiles... especially to test more black paints and I forgot to add some brown shades as well...


The white tile is not white... I went over with a translucent acrylic shimmer / pearl paint which you also can add to your normal acrylic paints. More glitter ^^


I also only tested my gold and not my other metallic colours because I work so often with them I know all their effects on all different backgrounds.


This is still without any finish. So with shiny gloss / lacquer the colours would get more intense...


Sonntag, 18. November 2012

Blue and golden - flower earrings


Little flower earrings in different shades of blue and violett, with a hint of gold and bronce. Normally I prefer glas beads (or the polymer clay beads I make myself). Plastic beads... or rather (because polymer clay is also a kind of plastic to be honest) industrial produced plastic beads are not really the things I like to work with. High quality plastic beads like lucite may be a difference... and because I was so into the petal flower shape I ordered some and tried them. 


Yes, they were nice. Just to look at them made me smile... but... oh yes, there is a capital but! but... the colour had no depth even thought they were translucent. I tried to combine them with wire and glas beads... but always... no, didn't work for me. 


Until I started painting them! I added some darker blue with aqua acrylic colours and added with bronce and gold acrylic colours some finishing touches at the end of the flowers. For this I am alwys using my finger tips... Can't work with brushes for such details ^^


Now I just love them! They work really good with the real glas beads. They lost their matte finish due to the water acrylic colours but gained more depth. 

Some of the pictures I took at direct sunlight. Not the best for taking earring pictures but I wanted to show you how the light plays with all the beads!


I got five different colours, two beads of each... I started with the blue ones, now I have to play with the other!

Sonntag, 11. November 2012

Steampunk buttons - polymer clay


This was an order I made. Already some time ago. The person who this got wanted together with a small button some going together with scarf pins... and also a really big button for display. This is also the person who got the steampunk polymer clay box because she looked around my blog and my shop and just send me a lot of things which I could use for molds or to make my cards! Really generous, I was a little bit speechless. And because I still was I made that box as a thank you. I am better with creating things for people than with the words...


And here are a some pictures of the process of creating. Like my template for the big button so the button holes would be sitting at the right place.


By the way: Don't let your unbaked polymer clay stay in contact with paper for too long. The paper will soak up all the polymers and the leftover will be brittle...


Of course buttons... (this pictures were all made at night, the time I am working with clay)


The first layer of acrylic colours: Black...


My "Written" or my steampun version....


Some of the daylight pictures (also not perfect but you know me and my time issues ^^)


The backside, one I tried to be removeable so the pin could be used for more than one "button".


LinkWithin

Related Posts with Thumbnails