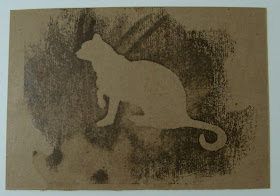
I just had to make some cards by aceton transfer now that I have some prints from a new laser printer (No, not mine *sniff*). I thought that the combination of the cardboard and the pictures you get with an aceton transfer would go great together.
And yes, in my point of view the old cardboard with the little bit rough structure of the surface and the worn out / rubbish (a little bit vintage, shaby...? don't know the actual nomenclature ^^) look of the black ink turned out to be a real good combination :)
I made a little collection of cards...
My crow stencil...
...you see my little mistake? The script is mirror inverted!
...of course the zebra isn't missing...
...one of my earlier loves from Karens graphics fairy!
To the left you can see the print after the transfer...
I tried several different methods (or better said a little bit different procedures...). I won't write them down just concetrate on the most important thing for the transfer:
Lay your print onto the desired surface (also wood or fabric is working quite well!).
Put a little bit aceton on a paper tissue and NOT on your print!
Now you have to be fast:
Press the paper tiessue with the aceton on your print.
And I mean "press"! It is only during the first contact with the aceton (or other kind of solvent you are using but aceton works best for me) that the colour starts bleeding. As soon as the aceton dries again the colour won't ever be transferable again (regardless how much aceton you would spill over the print). Also without the pressure the colour won't bleed into your target but stays in the print.
Look at the picture below: On the left side I used some pressure but put the aceton direct over the print. On the right side I used the procedure described above.
In short I would say: Pressure and aceton should be used at exact the same time!

And of course I used some of the tags I cut out yesterday ^^
You see how my skill improved?
The horse is an image from graphics fairy. I also made the cat and the swallow stencil from picutres from graphics fairy (Oh, I just love her collection!) The crow and the tree stencil are my own graphics :)
I have a lot more stencils and things I made by using them, just have a look if you like or jump over here for how to make your own one :)


i love the look of these transfers on the card. very vintage-y! i must try this! you must need good ventilation to work with the solvent right? I could do it outside when summer returns... :)
AntwortenLöschenI love that mechanical horse, I have it too! The transfers look very cool and antique. I love the imperfections.
AntwortenLöschenDie Methode ist total cool, und deine Ergebnisse natürlich auch!
AntwortenLöschenBeautiful blog! Fantastic works! Great Tutorials!!!
AntwortenLöschenThanks :)
AntwortenLöschen@hedgefairy: Danke :) Und sie funkt auch für Stoff und Holz extrem gut... beim Stoff bin ich aber noch am testen, inwiefern ich das fixiert bekomme, daß es auch etwas waschen aushält bzw. welches waschen es aushalten würde ^^
I'm excited to try this. Thank you for sharing this idea. :)
AntwortenLöschenThe zebra is my favorite. Thanks for the tutorial. This will be the feature on this week's Sunday Art Therapy at Seeds on a Breeze.
AntwortenLöschenGreat tips! Thanks a lot for sharing. loving the look of the transfers.
AntwortenLöschenDie Karten sind toll, und man ist immer so schön benebelt vom Aceton... ;-)
AntwortenLöschenDu solltest unbedingt noch eine mit dem ästhetischsten Tier der Welt machen, dem Schabrackentapir.
I featured you as a Fave today on Vintage Pollyanna!
AntwortenLöschenhttp://vintagepollyanna.blogspot.com/2011/01/tell-me-tuesday-10.html
ich habs auch schon probiert - mit aceton und holz - aber der gestank hat mich völlig außer gefecht gesetzt. bin nicht so zufrieden mit meinem ergebnis.
AntwortenLöschensuper:)
AntwortenLöschen