Dienstag, 29. März 2011

Inspirations: On the streets (Leipzig II)


There seems to be a trend with grafitti stencils and animals ^^ 


This is the sign of a Kindergarten.  I love how they used the stones and the shells :)


"Einsteinchens" means something like little "Einsteins"
(in german you can add "chen" to a lot of words to give it the meaning of cute and tiny)

Further more it has a double meaning. You see, it is not written as "Einsteichen" but as "EinSteinchen". So next to the meaning of little geniuses it also means "Ein Steinchen" which says one tiny stone. 

Suitable for the sign as well as for kids. Love this play of words as well as the look of the sign!


Another new member in the collection of graffiti animals: A rabbit!


This had its sibling around the corner ^^


And another one some streets away...


And guess what: Another pink monkey!


(They pink was a little bit lost due to the night. I didn't use spot light.)

Find all the structures!


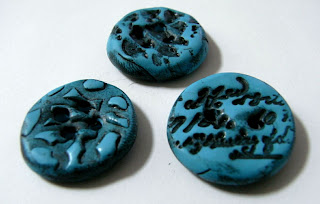
I just love structures. Therefor I started a search for structures around me. I wanted structures / textures to go with fimo (polymer clay) especially with buttons. Of course I used stamps and my button-size cookie cutter.


Wooden stamps, silicon stamps, handcarved rubber stamps, fimo stamps... 

And a little fimo stone I made years... (over 12 years I think... or even more...) ago with a little rune. I found it per accident in a little old box where I store old fotos ^^ But I was even more surprised as I saw that I used a colour of Fimo they don't produce anymore. It was a little bit like jade with wonderful marbled greens... 


After that I used all the things below! And some more... which I forgot to put in the picture. 

Maybe you find them? :)


The circles....! A JordiLabanda pen ^^


I added acrylic colours... just to experiment a little bit with shadows, the fluidity of the paints, how to rub the colour of, how my dremel could affect the result... All this kind of things. 

I don't like every button but I learned from every single one!

The reason for my choosen clay colours was easy: Leftovers! :)

I also made with my little carved key stamps some fimo molds...


Some pendants, mostly buttons...


Snailmail!


I confess: I love to get letters and cards!

The real snail mail :) No email and no phone call gives this special feeling...!

This beautiful card was waiting for me in my letter box. Isn't it beautiful?! I am still thinking is would be great as a fabric. It was made by centi (with other ones as well, take a look!)

She was so cool to send me one of the cards she made just because I asked whether I could get one! :)


It made my day :)


I added USB to my filofax ^^


This is my newest item I added to my filofax. It may seem quite strange to have a paper-based calender and then adding some electronic data storage but I need an advise to transport pictures, datas, pdfs, etc... Like most people, I guess, independent whether they need it for work or just want to take pictures, music, whatever with them. 


You remember the blank space above my big yellow post-it? I used a wee spot of this space to add a very flat  usb stick. 


For this I used little self-adhesive velcro spots I got from a scrapbooking friend (I am getting things for my stash everywhere ^^). 


Just put one side on the stick and the other side on the paper. That was all. Nothing more. Really. And this velcro spots are holding the stick really tight! I was surprised how good this worked :) 

And you see, the velcro doesn't interfer with the use of the stick. I added the soft side to the stick because of the propability that it could get in contact with my clothes .


To be honest, the velcro is nearly as high as the stick. I am not sure whether it is not too big? 

But on the other hand, I can't think how to get without it already. It is so nice to have everything in my filofax. Including the electronic stuff... 

Montag, 21. März 2011

New stuff for my filofax...


.. or "More few-minutes-projects". :)


Some time ago I was looking for more filofax stuff. Mh... mostly boring... (although useful... but... you know how it is ^^). I want to change the chaos in my handbag. I don't think I can conquer the chaos inside of my bag but maybe give it a new structure. I have my inspiration book (my cat book), a little adress book and to many little papers with notes and ideas and also an envelope for small things/papers/cards I find. Too many functions I want all to be integrated in my filofax. Some are easy like the adresses because I had some sides for them already in my filofax (although I am considering changing them also only not now). Some blank sides, the calender for 2011 and a ruler were also already inside.


Until now I added my first side (zebra first side). But I wanted more. Some post-its but not the normal ones and inspired from my sister Lachafa also some coloured blank sides (for sketches, ideas, writings...). She made a gorgeous travel journal (she was using the last weeks, I am so curious to see what went inside!). For the paper she used all different kind of colours, structures, sizes, added envelopes for the little items you collect during travelling and made a note book out of it. Even black sides or punched sides were used. So cool!

Here are my materials: Coloured paper (thin and more stable ones), cool post-its and a normal but big one, a green plastic protector (originally for identification card, etc)...


Just take an old sheet from your filofax as stencil, cut the paper out and punch the holes. The coloured sides are finished now ;)


All the colours!


For the post-its side I glued two more stable paper sides together with double-site adhesive tape. The same tape I also used to add the post-its.


Mh... you can see the tape, so lets put something inside!

Better ^^


The other side... I'll have to add something at the empty space (above the big yellow post-its). Open for ideas!


After that was done my eye fall on some earrings I bought to use the single parts (they were reduced to under 1€). I love glittering stuff. Of course I added one stone to the zipper!


Love it!

Sonntag, 20. März 2011

"Just minutes stuff" - fabric bag pillow


Okay, I have to admit that I love colourful fabric bags. Although the cotton is not so heavy it is very stable.


I have bought severals and spend some minutes to make a first trial one. Although I have sewn a lot of pillows I think I also love to make them this fast way.


Cut of the the strap and turn the upper side (where the fabric lays doubly to give the straps there hold) to the inside. After that my bag was a square (38 x 38 cm... by the way... make your pillow case one or two cm smaller than the filling if you use ones and are not stuffing the pillow case itself ^^)


I wanted to use hook-and-loop tape (is this the right term?) but I didn't found it. Sighs... but during my search I had a look at my poppers and used them instead (with this strange tool).


Finished. Writing took longer ;)

PS: To take pics in the middle of the night may not be the best idea ^^

LinkWithin

Related Posts with Thumbnails